Connect your Hygraph project to Scaleflex Filerobot
Scaleflex Filerobot allows you to gain control of your digital assets. This agnostic software - compatible with all applications and operative systems - can help teams to store, process, share, and accelerate images, videos, and static content on web or mobile applications.
#What you can do with the Hygraph-Scaleflex Filerobot integration
With this app you can upload, store, edit, manage, optimize, enrich and automate your media right within your Hygraph UI.
#Prerequisites to use this integration
- You must have a Hygraph account. If you don't have one, you can create one here.
- You must have a Hygraph project with at least one model.
- You must have a Scaleflex Filerobot account. If you don't have one yet, you can request a demo here.
- You must have a Scaleflex Filerobot project
Container ID. You can find it in the top right corner of your Filerobot dashboard, by your username. - You must have a Scaleflex Filerobot project
Security template. You can create it in your Scaleflex Filerobot project by navigating to Settings > Development > Security templates and clicking on+ Add template.
Apps are environment specific. This means their configuration is applied per environment. Take this into consideration if you're working with a project using more than one environment.
#Install the Scaleflex Filerobot app
Click here to install the Scaleflex Filerobot App on Hygraph, then follow these steps:
- Use the dropdowns to select which project and environment you want to install the app in, then click on
Install app. - The permissions pop-up will display. Click on
Authorize appto continue. You will be redirected to the configuration screen. - Fill in the
Container IDfield with the ID your copied from your Filerobot dashboard, and theSecurity template keywith theSecurity templatethat you copied from your Filerobot Development settings. You can find these keys in your Scaleflex Filerobot project by following the steps we described in our prerequisites section. - Click on
Save config settingsto finalize the installation process. A pop-up notification in the bottom right corner of the screen will indicate that the changes have been saved.
#Add the Filerobot field to your model
- Navigate to the Schema builder.
- Select the model that you want to add the Filerobot field to and click on it.
- Select the Filerobot asset picker field from the Add fields right sidebar.
- Complete the
Display namefield, and theAPI IDwill be auto-filled by the system. Optionally, you can also add aDescription. - This screen also allows you to control different properties of your Filerobot field: you can allow multiple values, or you can localize the field, by selecting the checkboxes in the
Field optionssection. - Click on the
Addbutton.
#Use Scaleflex Filerobot in your Hygraph project
- Navigate to the Content editor.
- Select the view that you configured the Filerobot field for.
- Click on the
+ Add entrybutton or, alternatively, edit an existing entry by clicking on the pencil icon. - Locate the Filerobot section of the screen and click on
Add Scaleflex asset. This opens a new screen where you can select an existing asset or upload a new one. - Select the asset(s) you want, then click on
Export. You will have the option to add the assets as is or transform them:As original: This option is available for all assets. Adds them to the content entry as is.Transformation: This option is only available for image assets. It lets you modify the image format, quality, size, and even crop part of it.
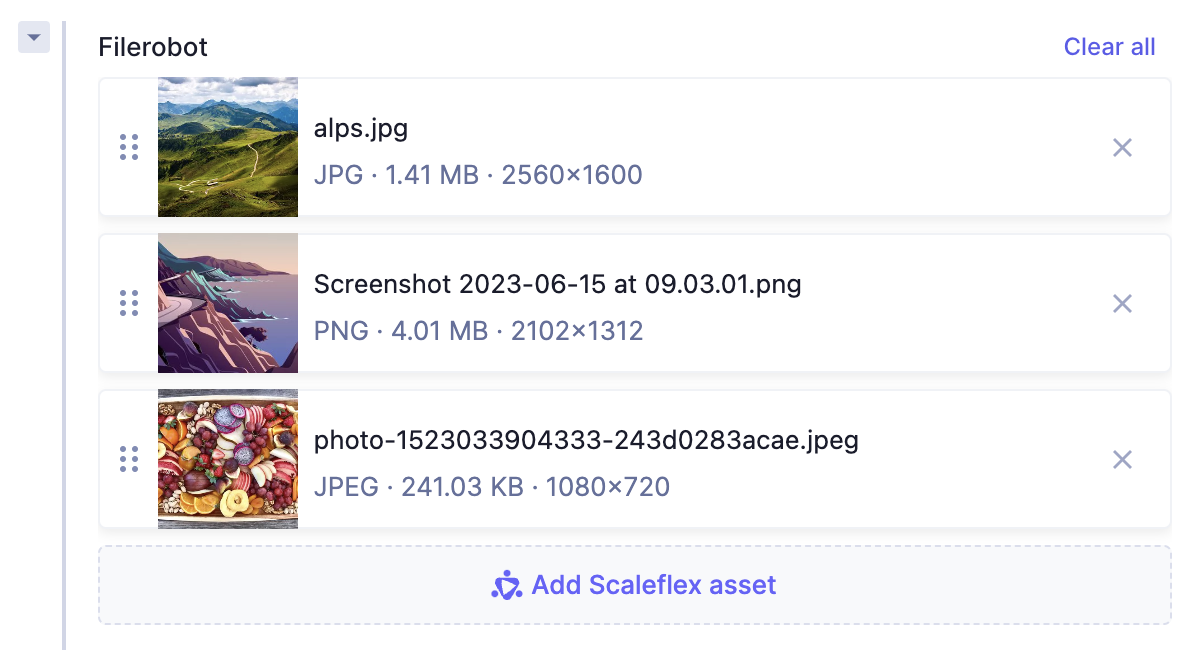
- After selecting the asset(s) you want and returning to the content entry, your selection will display on the list.
 Filerobot - Images in content entry
You can optionally use the six dots icon to drag and drop the assets to organize them in the order you want.
 - Finally, click on
SaveorSave & Publish, as needed.
- If you did not configure your Filerobot field to allow multiple vales, you won't be able to export a folder into your content entries. The system will let you know that you cannot export a folder to a single asset field.
- Exporting folders is not yet supported for multi-select fields.
#Resources